RoboLogix Overview
Unlike other robotics simulators, RoboLogix is designed primarily as an education tool, but has all the power and functionality of professional engineering-level simulation packages costing thousands of dollars. Consequently, RoboLogix is ideal for students as well as robot designers and engineers. The ability to preview the behavior of a robotic system in a "virtual" world allows for a variety of mechanisms, devices, configurations and controllers to be tried and tested before being applied to a "real world" system.
RoboLogix receives Control signals, determines if contact or collision between objects in the system has occurred, and returns simulated sensor information as feedback. This system has the capacity of Real-time simulation of the motion of an industrial robot through 3D animation. The principles of 3D motion simulation and both Geometry modeling and Kinematics modeling are presented in the RoboLogix virtual environment.
RoboLogix is a robotics simulation software package that is designed to emulate real-world robotics applications. With RoboLogix, you teach, test, run, and de-bug programs that you have written yourself using robot arms and end effectors in a wide range of practical applications. These applications include Pick and place, Palletizing, Welding, and Painting and allow for customized environments so that you can design your own robotics application. With RoboLogix, the user can run the simulator to test and visually examine the execution of robot programs and control algorithms, while plotting instantaneous joint accelerations, velocities and positions. The simulation software allows for verification of the reach-ability, Travel ranges and Collisions. This allows for increased reliability of the planning process and program development as well as reducing the overall completion/commissioning time.
RoboLogix enables programmers to write their own robot programs, modify the environment and use the available sensors. These sensors include both Analog and Digital detection devices and are used for functions such as obtaining the desired position of the robot end effector. In addition a teach pendant/control panel is included with the simulator that allows the user to command the robot to pick up a Tracked object and return it to a home location through Jogged commands or pre-programmed positions.
The benefits of RoboLogix include:
- User-friendly 3D interface allows for "real-world"simulation
- Test and de-bug programs in a safe, non-hazardous environment
- Perform accurate robot simulations to verify reach, cycle time, through-put, etc.
- Design or edit robotic programs without tying up programming time on an actual robot
- Compare robotic programs in order to optimize Cycle times
- Enter, modify and retrieve programs using a simulated teach pendant/control panel
RoboLogix introduces the concepts of multi-axes robots and demonstrates how they can be used in a plant or manufacturing system utilizing 3D simulation . The primary focus of the software is on Automated manufacturing processes and allows for the programming, testing, and debugging of robot programs. Users gain practical, "hands on" programming of an industrial robot through a combination of teach-pendant programming, and 3D simulation environments. It is a powerful learning tool that provides students with access to robotic equipment worth tens of thousands of dollars.
A control panel is included with RoboLogix that allows the user to command the robot to pick up a tracked object and return it to a home location through jogged commands or pre-programmed positions.
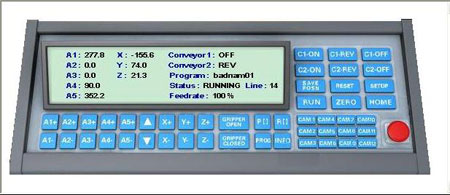
There are several command instructions on the control panel such as Reset, Home, Setup, and Zero which are used to automatically set the robot to a specific position for calibration or realignment. The Reset instruction is used to clear program errors and reset the system. The Home instruction will return the robot to its home base position, and the Zero instruction will reset the robot arm coordinates to zero. The Setup key provides access to a dialog box with setting adjustments for conveyor speed, as well as feedrates for Angular (Deg/Sec.) and Linear (cm/Sec) jog instructions. In addition, the Setup dialog box also allows for independent adjustment of the A5 rotary tool feedrate.
The control panel is capable of providing up to five axes of control, with each axis represented by A1, A2, A3, A4, and A5. These keys are often referred to as "jog" instructions and are used to move, or jog, a particular axis a certain number of increments or degrees. In addition, XYZ keys are also provided to allow movement in orthogonal directions. The Gripper Open/Closed instructions are used to pick up and release objects to be held by the end effector. Various program command keys are also included on the control panel. These keys are used to write, edit, store, recall, and execute robotic programs.
The default Work envelope for RoboLogix is shown in the image below. This scene consists of two conveyors, workpieces (boxes), pallets, and the control panel. The robot arm used in this environment will perform pick-and-place, point-to-point, palletizing and De-palletizing and a range of instructions to demonstrate programming and de-bugging operations.
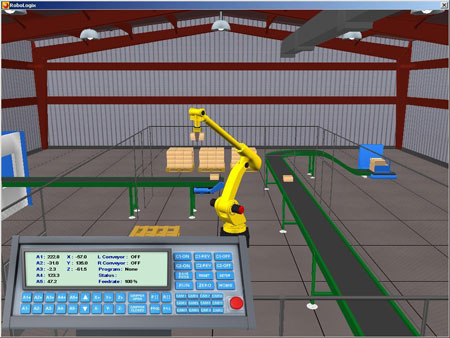
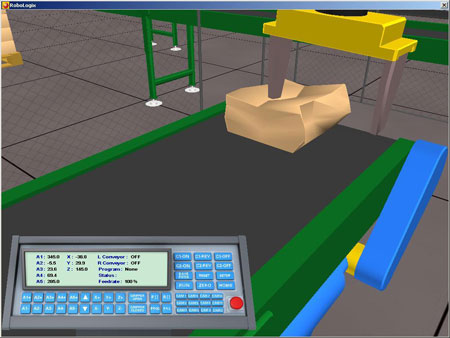
The RoboLogix programming environment is completely safe, but provides a very realistic simulation of control systems using robotic equipment. When a workpiece becomes damaged due to collision, falling, or improper gripper position, the workpiece will turn into a crumpled box. The damaged workpiece can be cleared, or removed, from the work envelope by pressing the Reset key on the main menu of control panel. The image below shows an example of a damaged workpiece.
There are four types of 3D worlds: pick & place, spot welder, arc welder, and painting. The 3D worlds for the spot welder, arc welder, and painting robots consist of one main conveyor that transports car bodies along a path. These three worlds, the conveyor passes through the work envelope where a pair of tandem robots perform various programmed tasks. With the tandem robot configuration, only one program is used but the workflow is doubled by having a second robot performing the same operation on the other side of the car. While it is common in industry to see pairs of robots each performing different tasks, for the RoboLogix simulated world the tandem robots can only be configured to execute the same program.
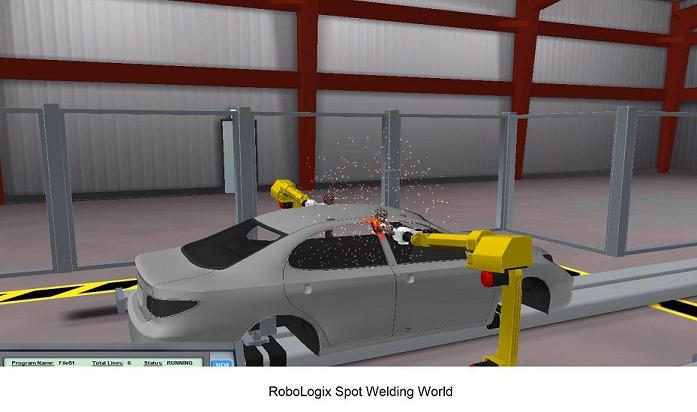
For the robot spot welding system shown below, it can be programmed in either the walk-through or online mode using RoboLogix. With the walk-through method, a computer mouse is used to simulate the movement of the robot arm for positioning. The mouse cursor is positioned on the location of the desired weld and a mouse-click records this location. The teach pendant for the RoboLogix spot-welding world has buttons such as car forward/reverse/stop to move a car to be welded into position in the work envelope.
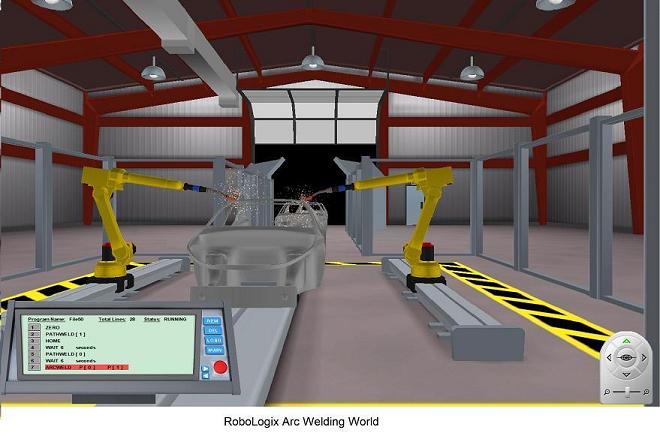
The RoboLogix arc welding environment is shown below. This 3D world is essentially the same as the spot welding world and shares the same teach pendant. The main difference between welding worlds is the end effector. Note that it is now an arc welding torch instead of the caliper-style spot welding end effector. The arc welder is programmed to begin the weld at a certain point and end the weld at another point. This can be accomplished either by using a mouse to "draw" the weld path or by jogging the end effector to specific points and recording these locations.
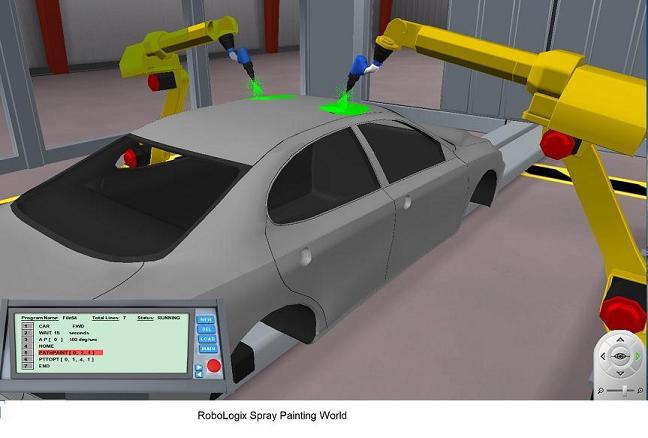
Spray painting robots have the same programming methods as welding robots and can be either programmed online, offline, or using the walk-through method. With RoboLogix, the walk-through programming method consists of "drawing" the paint path using a mouse. The online method uses a teach pendant to jog the end effector to the paint path locations and record the coordinates. The image below shows the RoboLogix spray painting world. The teach pendant in the painting world has the same instruction set as those used in the robot arc and spot welding worlds, but also provides access to the choices of paint color and width of the paint spray through the point-to-point command setup dialog box.
